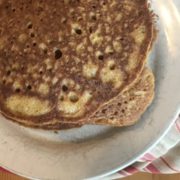
Best Sprouted Buckwheat Pancakes

We make these pancakes about once a week in our house. They’re easy to make, nutritious, and really hard to mess up! We usually make some kind of a fruit topping for these so we don’t use as much maple syrup (see Blueberry topping in the Sauces/Dressings section), but you could also eliminate the maple syrup and use this as a savory pancake to go with a curry, stir fry, or other inspired topping.

Soaking grains helps to degrade their naturally occurring phytates. Phytates keep grains from growing into a plant when they’re not in the proper environment, but once they’re exposed to water, phytate decreases and the seed starts to sprout.

**You need to soak the buckwheat groats for at least 10-12 hours, so be prepared for that**

Makes 9 large pancakes

Ingredients

2 cups buckwheat groats (do not confuse with kashi, which are toasted buckwheat groats)

3 -4 cups water

3 tbsps apple cider vinegar or lemon juice

3/4 cup milk

3 tbsp maple syrup *optional

3 eggs separated

1 tbsp vanilla

1 tsp baking soda

3/4 tsp salt

Coconut oil for cooking

Instructions

Put buckwheat groats in a bowl with the water and apple cider vinegar. Soak for at least 10-12 hours, or you can change the water and keep soaking for another day/night. The water will be a slimy consistency which is how it’s supposed to be.

Put all ingredients except egg whites into your blender or food processor and blend until smooth. In a separate bowl, whip egg whites until soft peaks form. Add the batter to the egg whites and fold together gently.

In a stainless steel or cast iron frying pan melt coconut oil over medium heat. Test heat by flicking a tiny bit of water onto the pan – the water should bubble slightly when it’s hot enough. Pour in desired amount of pancake batter and flip once bubbles have formed over the entire pancake.

Add your favorite toppings and enjoy!

These are hearty pancakes, so if you can’t eat all the batter, store it in the fridge for 2-3 days for fresh pancakes on demand!! YUM!!


Deconstructed Huevos Rancheros

This breakfast has it all – variety, awesome flavors, and a nice balance of protein and good fats. It’s tasty enough that you can have it several times a week without getting bored of it, and simple enough to be thrown together in 5-10 minutes. I can’t recommend highly enough that you use Amy’s brand refried beans as they are super tasty right from the can.

Serves 2

Ingredients

4 eggs done in whatever style you like best

1 can of Amy’s refried beans

2 servings of veggies – zucchini, spinach, broccoli, red chard, kale, etc

1 avocado

Salsa

Directions

Heat refried beans, cook veggies however you prefer them (I often will saute spinach or zucchini in the same frying pan as I heat up the refried beans just to save dishes and time), and slice avocado.

Put beans, eggs, and veggies on your plate with avocado and salsa and get ready for a truly satisfying brekky!


DIY Beeswax Food Wraps with Video

These beeswax wraps are super useful and great for the environment! Use them at home, give them as gifts, and keep working on reducing your plastic waste!

Materials:

Lightweight, low thread count cotton

100% pure beeswax pellets or block

Parchment paper

Baking sheet (with sides)

Instructions:

Preheat oven to 225ºF.

Cut material into desired shapes.

Cut enough parchment to completely cover your baking sheet (I used some utensils to make sure my parchment paper was weighed down enough that the melted beeswax didn’t spill over the side).

Put cut out shapes on the parchment and sprinkle with beeswax pellets.

Put in the oven for 3-5 minutes, or until all the beeswax is melted.

Remove from the oven and carefully lift an edge of the material with a spatula. Lift the material so that any excess beeswax can drip off.

Place material on a paper bag and allow to dry. It dries quickly and will only take a few minutes.

Once dried, use your new beeswax food wrap to cover leftovers, wrap sandwiches or snacks by shaping it with the heat of your hands.


Dr. Kira’s Roasted Winter Veggies

Who doesn’t love roasted veggies in the winter?! Everything is in season, it goes with a meal or stands on its own and it’s such a satisfying blend of flavours and colours. I vary this recipe every time I make it depending on what I can get at the farmer’s market but this is a good place to start.

If you use kabocha and delicata squashes you can leave the skin on while baking and eating them.

It’s rustic and delicious!

Serves 6-8

3-4 potatoes (of any variety) chopped

1 medium-large yam chopped

1 medium-large (kabocha or delicata) squash – seeds removed and chopped

4 carrots chopped

2 onions chopped

2 apples (gala, spartan, etc – any variety that’s good in pies or crisps) chopped

1 head of garlic with the skins left on

olive oil

salt and pepper


Instructions

Preheat oven to 400ºF

Put all veggies in a 9×11 pan or roasting pan. Toss with enough olive oil to coat and season with salt and pepper.

Roast for 40-60 minutes stirring every 15 minutes or so until carrots and potatoes are tender enough to put a fork through them. Add more salt or pepper once cooked if needed. Enjoy!


Simple Tasty Quinoa Breakfast

It took me awhile to warm up to the idea of quinoa for breakfast, it always seemed more like a savory lunch/dinner grain to me. But add a few toppings and Bwhamo!! – quinoa is breakfast!! Tailor this to your own tastes (I recommend at least one crunchy thing like toasted almonds or coconut and one sweet thing like raisins, apples, honey, or maple syrup) and enjoy knowing that you’re starting your day with almost a full deck of protein building amino acids.

2 large servings

1/2 cup quinoa

1 cup water

Optional toppings:

Raisins

Toasted coconut

Toasted almonds (whole or slivered)

Diced apple

Seasonal fruit

Spices: Cinnamon, apple pie spice, cardamom, ground ginger, etc

Rinse quinoa thoroughly in water. Bring to a boil in a covered pot, then turn heat down to low and simmer for 15 minutes.

Add your favorite toppings and enjoy hot and toasty.


New Research on Heartburn Medication

New research is showing us something we didn’t know about medications given for heartburn. The class of drugs we’re talking about are proton pump inhibitors (PPIs) such as Losec, Nexium, Prevacid, or Pariet. These medications account for 1/3 of all prescriptions given in Canada annually and they do something we previously thought only occurred with antibiotics.

It’s been found that PPIs create a marked decline in the diversity of your microbiota (all the good and bad bacteria contained in your gut) within 7 days of starting them. Once the medication is stopped, it takes about a month for partial reversal to take place.

With this comes the increase risk of C. difficiles, increase risk of overgrowth of bad bacteria in the small intestine (SIBO), and decreased bifidobacteria population in the colon.

This may not sound like a big deal, but to give you an idea of how impactful this can be to your health – there is a bacteria that feeds on the oxalates responsible for kidney stones. If they are wiped out by PPIs or antibiotics, they don’t come back. This would drastically increase your chances of getting kidney stones at some point in your life. This is just one of the multitude of examples that could be given.

This same effect has also been seen with use of NSAIDS such as aspirin, Celebrex, and ibuprofen.

If you have heart burn and are wanting to come off your medication, I suggest doing so under supervision of your Naturopathic physician or Western doctor. I have written previous blogs on how to heal heartburn naturally, and how to reestablish your microbiota once it’s been wiped out.

The microbiome is truly a powerful part of our overall health and well being, and it’s up to us to nourish and protect it :)

Transform your gut in 3 easy steps!

Transform your gut in 3 easy steps!

A healthy gut is the foundation of your entire body and therefore has an enormous impact on your health and well being. If you think your gut might need some TLC, try the following steps:

1) Eat PRObiotic foods – probiotic bacteria aid digestion, balance the immune system, and ward off infection. In my opinion, they are one of the keys to optimal health and disease prevention. Probiotics are found in fermented sauerkraut or pickles (you’ll find them in the refrigerated section), kefir, miso, kombucha, kimchi, and tempeh. Yogurt can be a great source as well, but avoid brands that add sugar, colour, and other junk.

2) Eat PREbiotic foods – prebiotics are indigestible plant fibers that the probiotic bacteria eat. If you get really gasey or bloated when you eat high fiber foods, it’s because prebiotics feed the ‘good’ and ‘bad’ bacteria so it’s usually a sign that your bacterial balance has too many of the ‘bad’ bacteria. Cut back your dosages to manageable levels (for you and everyone else!!) and slowly increase until you have no symptoms. Prebiotic foods include garlic, onions, leeks, dandelion greens, chicory, asparagus, and bananas. These foods work best as prebiotics when consumed raw.

3) Eat glutamine rich foods – the cells along the digestive tract that absorb all our nutrients are called enterocytes. These little guys thrive on an amino acid called l-glutamine. Eating foods high in glutamine can help decrease inflammation and increase digestive productivity. High glutamine foods include spinach, cabbage, parsley, beets, peas, beans, and lentils (again, it’s best if the vegetables are consumed raw).
Happy digesting everyone!

Step away from the salad!!!

Step away from the salad!!!

What the heck?!? Since when does a Naturopathic Doctor advocate for fewer vegetables?? Don’t worry, I haven’t had too much Kombucha, it’s just that fall is here with winter on its heels. In general, our bodies do much better with warmer fare when it’s cold outside.

When I say warmer fare, you probably think of soups, stews, and crisps but this is only part of the picture. In Chinese Medicine one of the ways food is categorized is by the reaction it creates when ingested into the body. These reactions can be heating, warming, neutral, cooling, or cold. For example:

Cooling Foods include bananas, lettuce, cucumbers, sprouts, tomatoes, pears, tofu, etc

Warming Foods include ginger root, black beans, lentils, nuts, cinnamon, quinoa, cabbage, kale, etc

Since the winters we experience in the Vancouver area tend to be cold and damp, including more warming foods in your diet in the winter is a good idea for most people.

Happy Fall everyone and here’s to a warm and healthy winter ahead!

Simple Cold and Flu Remedies

With cold and flu season right around the corner, I’m sharing my favorite home remedies to help get rid of nasty bugs before they take hold. Both garlic and ginger have antimicrobial and antiviral properties making them perfect for whatever is going around. Get plenty of rest, take a fast from sugar, and you’ll be back to health in no time.

Fresh Ginger Tea
4-5 slices of fresh ginger
2-3 cups water
Honey *optional

Place ginger and water in a pot, cover and bring to low boil then simmer for 5 minutes. Drink 2-3 cups/day. If you have a sore throat add some honey after the tea has cooled slightly.

Raw Garlic Kicker
1 medium to large garlic clove (preferably organic)

Chop garlic finely and let sit for 5 minutes. Put garlic on a spoon, close your eyes and swallow with water.*

*do NOT chew the garlic, this will create crazy garlic breath – swallow it like you would swallow a pill. Do this away from food 1-3x/day, especially before bed.
***If you experience heartburn, use caution with this remedy as it may trigger heartburn. Try taking the garlic with food.

Clarity + Planning = Better Health!

“Most people think they lack motivation but what they really lack is clarity” 
– James Clear – Author of “1% Better Everyday”

Clear cited a study about motivation where three groups of people were asked to exercise. The first group was asked to track their exercise, the second group was given a motivational speech, the third group also got the motivational speech, but were then asked to write down when, where, and how they would exercise. In the end, the third group exercised 2-3 times more than the other 2 groups. So having an intention is important, but mapping it out leads to greater chances of success! I find this all the time in my practice. If I can get someone to nail down the particulars of how they’re going to integrate a new healthy habit, they’re much more likely to do it.

Try it yourself: write down 2 healthy habits you’ve been meaning to incorporate into your life. Then write down the days of the week you’ll do them, length of time needed to complete them, environment you’re most likely to succeed in, and how you’ll feel once you’ve done them. Make the plan for 6 weeks, then send the list to someone you can report your progress to.

For example: say your goal is to eat more vegetables. You decide you want to aim for 4 servings of veggies each day and decide that meal planning will be the best way to ensure you’ll do it. You choose Sunday and Thursday nights to meal plan. You set up your environment by designating a pad of paper and pen for meal planning and put it next to your cook books. Your goals are to feel energized, have a dewy glow to your skin, and be an awesome example for your kids. You send your list to your sister who decides she’s going to do it with you. You’ve taken the first step to crushing your goal!

So get out your pen and paper, map it out, and make it happen!